Bluebeam offers a lot of ways to modify the colors of various objects. The markup and text colors are the simplest to modify. But what escapes many users are the advanced color manipulation features available for images of all kinds.
Snapshots
As an engineer, I often must overlay two images over one another to compare them. Whether it’s structural drawings over architectural drawings, or new over existing, or revisions over original scope, you’re sure to benefit from overlays. I’ve watched senior engineers print documents to scale and then use transparent paper to painstakingly sketch out objects of interest that they then awkwardly try to transfer to the other paper.
Bluebeam simplifies this process and provides high-fidelity options for overlays. First, you need a snapshot to modify. Use the “g” hotkey to take a snapshot of a PDF document that you want to use as the overlay image. Then use “ctrl + v” to paste it on the other image. You can drag the snapshot around to align it exactly where it needs to go.
As every engineer knows, this can be much harder than it sounds, especially if both images are the same color or if the snapshot turned out opaque. You can click the snapshot and adjust the opacity so you can more easily see what’s behind it. If it has a white background, you can click the snapshot and click the “Change Colors…” button (or right click the snapshot and select “Change Colors…” from the drop-down menu) and then change white to transparent (the box with the red slash through it). This is through the “Modify Colors” Process Type—see image below.

Changing black to red, removing white from an image
My personal favorite way to do snapshot overlays is to use the “Colorize” option and change the overlay image to light purple and 70% opacity. The image below shows an example of overlaying mechanical drawings onto the structural backgrounds to locate the mechanical units.
Sometimes I need more than two things overlaid and I can use different colors for each image to keep it all organized in my mind and on the screen. You can place markups on the screen and trace things as needed and then delete the overlay when you’re done.
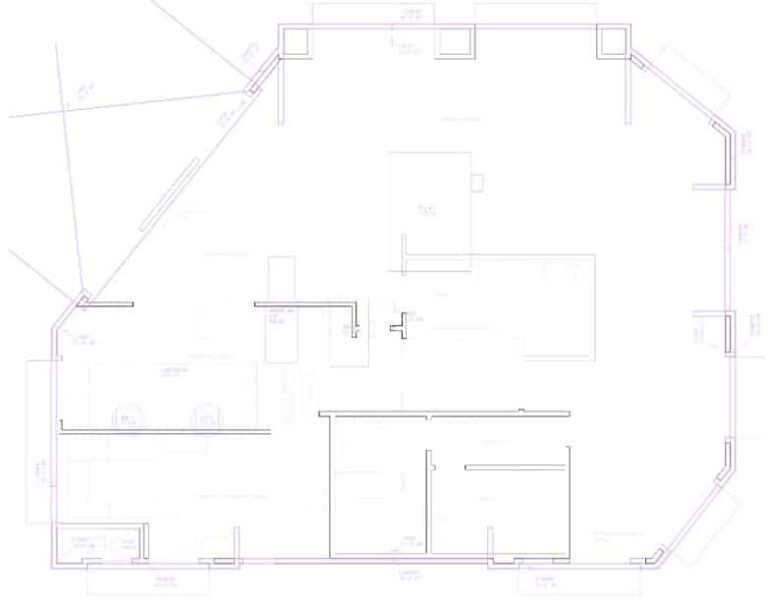
Purple mechanical overlay on structural background
Photos, Scans
Right click a photo file, select “Open with,” and then select Bluebeam. Similarly to the snapshot section, you can click the “Document” menu in the toolbar and then select “Color Processing…” to access the same color modification features except that they apply to the document itself (not just markups or snapshot objects). Sometimes I will set a photo from a site visit to grayscale and lighten it up and then markup solutions on top of it for a contractor. Watermarks or similar can also be added to documents in this way. It’s a nice touch to flatten it once it’s in position.
Another incredibly useful way to use this feature is to make scanned documents (including as-builts) more legible. Look at the difference in legibility between the original blueprint image (left) and the colorized white-to-black version (right). The left image has literally had an acid trip in a basin to create that eyesore, and the right image looks clean.
Once you have the colors the way you want them, you can also use the “Mask Images” Process Type to then hide the gray artifacts that are residual from the smearing and scanning. What you’re left with is a fresh and clean-looking black-and-white image without all the noise. Then to complete the ouroboros, you can snapshot the image and then adjust its color and opacity as a snapshot overlay.
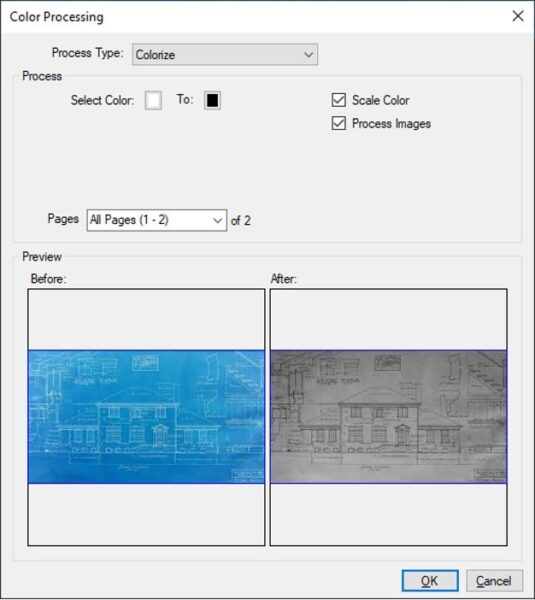
Colorizing as-built blueprints
Color Magic
There are straightforward color modification features available for standard markups, but Bluebeam isn’t constrained to modifying these objects; it can also modify snapshots, photos and scans in robust ways. Creating overlays is a staple for an engineering office. Fixing up a dark photo or grainy scan is something we can all relate to. I use these features multiple times a day to stay efficient, and you are certain to find relevant applications in your work and daily life, too.
Chris Graham is a structural engineer in Southern California. Chris brings the powerful tools of Bluebeam to bear on the design team side of the construction industry. He is happy to entertain discussion of all things Bluebeam and structural engineering at [email protected].