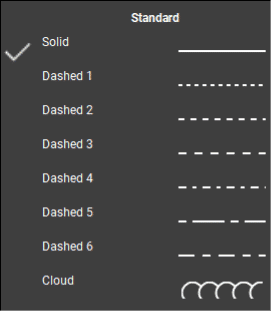
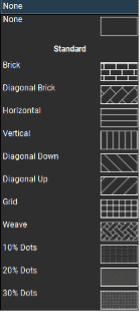
Bluebeam comes preloaded with various default linetypes and hatches to apply to markup objects. When you use the Properties tab to modify an object’s linetype or hatch pattern, you’ll see these by default:


These serve well for most applications, but some of the savvier users will want to expand their repertoire. Bluebeam Revu allows you to create custom linetypes and hatches in exquisite detail—here’s how:
Custom Linetypes
Select an object and use the “Style” drop-down menu and select “Manage…” This opens a new window, where you will see the “Standard” and “Advanced” sets of linetypes by default. You cannot modify the “Standard” set (which prevents you from shooting yourself in the foot), but you can use the “Add” button to create new distinct sets of linetypes. Once you have a new set, you can add individual new linetypes. If you already have some that were made (.blx file), you can import them with the “Import…” button.
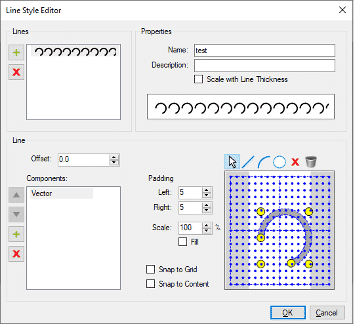
Once you’re at the Line Style Editor menu, you can begin creating your custom linetype. Start by naming the linetype and giving a description if desired. Then at the lower left, click the green plus sign to add a new component of the linetype. You can add a dash, space, dot, text or vector. The first four options are fairly self-explanatory. The vector component can consist of line segments, arcs and circles. The padding options create additional space before and after the vector arrangement. If the vectors go into the gray-shaded region, they will overlap the previous or next component. Arcs can have their lengths modified to subtend an angle other than 90 degrees by clicking the mouse icon, selecting the arc you drew, then dragging the yellow nodes at the ends of the arc.

Modifying an Arc Vector Component in the Line Style Editor
You can also create more complicated linetypes by stacking multiple custom lines together. In the upper left, click the green plus sign to add another line. These lines can be offset vertically to create complex features such as railroad tracks.
Custom Hatches
Select an object and use the “Hatch” drop-down menu and select “Manage…” This opens a new window, where you will see the “Standard” set of hatches by default. You can modify this “Standard” set (unlike the custom linetype set). You can use the “Add” button to create new distinct sets of hatches. Once you have a new set, you can add individual new hatches. If you already have some that were made (.bhx file), you can import them with the “Import…” button. Many of you in the construction industry will be excited to know that within this menu there is also a button to import AutoCAD patterns so you don’t have to create those from scratch.
Once you’re at the Manage Hatch Pattern Sets menu, you can begin creating your custom hatches. Start by naming the hatch and giving a description if desired. The hatches can consist of line segments, small dots and large dots. Draw them in and watch the preview update in real time in the lower left. While arcs are not available, a few line segments can approximate curves very well once seen in the context of your markups.
While this doesn’t cover all the minutiae of custom linetype and hatch design, it’s enough to get you well on your way to creating clean and professional markup objects of your own design. Custom linetypes and hatches have been critical to my engineering drawings, and I hope they vastly improve the quality of your future work as well.


