Do you ever receive documents containing viewports or layers that have carried over from CAD software through the printing process? They can slow things down and cause confusion between what’s intended to be visible or hidden.
The quick solution is to “flatten” the documents. What does that mean?
The way I explain flattening is pretend the document is a whiteboard, and all the markups we do in Revu are placed on top of the document content as if using those special whiteboard markers.
When we choose to flatten markups, we’re basically turning those markups into a permanent marker and, once saved, we cannot recover the original.
Think of it as using a Dry Erase marker vs. a Sharpie.
So, other than reducing confusion and file size, why would someone flatten a document?

The first and most obvious answer is when you add an image of a signature or other sensitive information. Also, maybe you have bid or as-built information you don’t want anyone to edit or remove.
With Revu, it’s not simply flat or not—there’s a lot of flexibility, including unflatten, flatten to a layer, flatten selected markups or flatten everything.
To explore these options, let’s look at the “flatten markups” window.
In the document menu at the top of Revu, go all the way near the bottom of the menu, select “flatten” (Ctrl+Shift+M). Or, if you have Revu Extreme, you can select “flatten markups” under the batch menu. You’re not required to have any documents open to flatten them unless you want to select specific markups to flatten or unflatten.
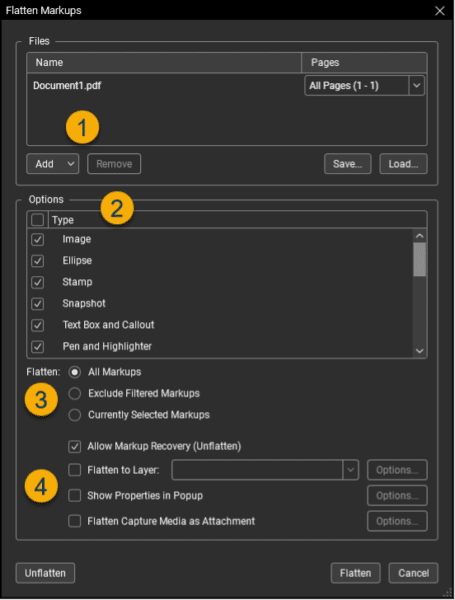
First, in the “files” section, you can add “open files,” “folders” or even “subfolders” to the list to batch flatten the entire list. Often when I select “open files,” I don’t want all the open files flattened, so I select those here in this list and click “remove.”
Second is the “options” section. To flatten everything, simply check the box next to “type” and notice all the boxes checked indicating those items will be flattened. You can unselect individual items as needed. Notice at the bottom of the list when you choose to flatten form fields, they cannot be unflattened. This means the fields cannot be recovered once saved.
Third, you’ll see a list of flatten options, which show how flexible the process can be rather than simply flattening everything:
All markups. Just what you expect, this will flatten all markups.
Exclude filtered markups. If you have a filter applied to the markups list, using this option will respect those settings when you flatten the document.
Currently selected markups. By dragging to draw a window or using the shift key to select multiple markups, you can click the flatten button; selecting this option will only flatten the markups you have selected without manipulating filters, turning off layers or hiding markups you don’t want flattened.
Lastly, you’ll notice a few output settings to choose from:
Allow markup recovery (unflatten). This would be used if you see yourself editing the markups later. Keep in mind that if you allow recovery, anyone receiving the drawings will be able to unflatten them.
Flatten to a layer. Rather than pressing the markups into the original, you can send them to a new or existing layer, allowing you to visually show or hide them.
Show properties in popup will allow you to see markup metadata by hovering over the flattened markups. This is a great way to add information without cluttering the document or leaving it editable.
One example might be an office seating chart. When you hover over someone’s name, a note can pop up showing IT equipment, phone or other contact information, calling out existing equipment in a P&ID plan set or keeping security system settings and punch codes recorded in a safe place.

Flatten capture media as attachment is one of my favorites. This will take all the images you have attached to your markups and add them to a report called a “Capture Media Summary.” This means the images can be sent with the document without remembering to attach the files.
I hope this helps you understand the flexibility and power behind a simple function like flattening and sparked some creative ideas to incorporate into your workflows.

Troy DeGroot
Troy DeGroot is a Bluebeam certified consultant, Bluebeam certified instructor and implementation specialist. Troy works with project managers, BIM/VDC managers and CEO/CIOs to increase productivity, predictability and maximize software adoption.